Friday, November 19, 2010

These are a few of my favorite things.....

When The Baby Bites,
When The Kids Scream,
When I'm Feeling Sad,
I Simply Remember My Favorite Things,
And Then I Don't Feel So Bad!

 Ahhhh, this is so appropriate, considering the morning I've had.  I was ready to throw in the towel 20 minutes after I got out of bed. So once I dropped the girls at school, I decided that a shower, make up and a cute outfit would help me feel better. And guess what? It did.

A little eye candy doesn't hurt either, so I rounded up 'A Few Of  My Favorite Things!' I think this will become a regular thing on here. On with the goodies!

Favorite Things Friday!

   MUSIC~ Mumford & Sons. I mentioned them on my post the other day. I can not stress to you how much this band rocks! Their lyrics are intelligent, heart felt, and moving. If you haven't listened yet, make it happen today by clicking on the video below! You will not be disappointed. Promise.

The Video


So, I couldn't get the video to upload. Blogger is acting a little like my children this morning.......petulant.  A link will have to do.

  Mi CASA   ~ I am drooling over these new rugs from DwellStudio!
Pretty sure this grouping of colors/pattern/print, need to be in my life. On a daily basis. I soooo wish they made fabric.

PHOTOGRAPHY~ I just stumbled upon this blog, The Dream Walking Society, during a random google search, and I am so pleased that I did. The imagery is breathtakingly beautiful and surreal.

HOLIDAY DECOR~ Wreaths! Fat ones, skinny ones, velvet, paper, and yarn covered ones. I've never been much of a wreath person, but this year the DIY world has brought their A game and I like it!
Felt Ball Wreath
                                                             Yarn Felt Flower Wreath


Nonna Wreath


FASHION~ Old school Military Style boots. I tried these on a while back, and can not stop thinking about them.

I am certain they would go with everything I own! Or at least that's what I'm telling myself, to justify yet another boot purchase ;)    Unfortunately I can not remember the maker. Here is a similar style at Aldo.

EATS~ Italian Puff Pastry, from a really sweet friend.
That does it for my favorite things.... for now at least! Happy Friday! ~ Katrina


Wednesday, November 17, 2010

My Girls Surprise Birthday Party!

Finally, I get to share these with everyone! It really was a huge success. They were elated, and so was I!

 Unfortunately these were the best shots I could find....I'm sure you can understand why they are so blurry. I also need a DSLR. Kenz was so shocked, she got all teary... sweet girl. And Coeli, was a deer in the head lights. Once she comprehended what was happening, she was stoked!

Now for all the goodies!

 I really enjoyed making all these decorations. They were mostly done in the evenings, after all the kiddos were in bed, or at school. You can find the tutorials here and here.

Then there was the cake! Seriously sooooooo good. Maybe THE most adorable cake I've seen.
Made by my talented and generous friend Jo. Thanks so much lady. I'll say it again,'YOU ROCK!"

The favors!
I had every intention of making kettle corn for them.... but in the 11 hour, I got real, and bought some white cheddar smart pop. Here is the super super easy recipe that I found.


All the effort, time, planning, and money (what little we did put into it), was all worth it just for this.....

Priceless.
Her first pair of earrings.

Thank you to all our friends and family, for helping out with food and drinks. Even though it was a very small gathering, the atmosphere was vibrant an fun. What a great day! ~Katrina

P.S. I did make Coeli her Kitty sweater stuffie! Check back in the next few days and I'll have the how-to up. I'm still recovering from the party mayhem :)

Journaling....

Ahhhh, Journaling. I love it. It's probably been a year since I've done it. Yesterday, this incredible song by Mumford and Sons was on my heart all day. I just had to get it onto paper. Something about putting "it", whatever "it" may be at the time, onto paper.....just solidifies in my heart.

If you haven't listened to Mumford and Sons yet, I highly recommend that you GET ON IT! Their lyrics are truly inspiring.

Question: What are you guys listening to? I love finding new and inspiring music, so share :)

Check back later today, I'll have the full Surprise Birthday Party Post up! ~Katrina

Friday, November 12, 2010

Birthday Party Prep Part 2 Tissue Paper Pom Poms!

I soooooo wish I were one of those people who could regularly survive on 4 -5 hours of sleep a night. But, I'm not. I need a solid 7 hours, at least. Or I am no fun to be around for a good part of the day.

In realizing this, and my current 'lame' state of health. I have to adjust my expectations. So my previous ambitious list (last post) is being shaved down to a more realistic list. It's looking something like this...

1. Paper Bunting  (Check)
2. Pinwheels  Tissue Paper pom poms (today's post (check))
3. Party favors
4. Sweater Stuffies
5. Birthday Girl Skirts  :(

So that's it. I figure if I can get those few things done, everything else is a bonus!
On with the Pom Poms! I know this isn't a new idea but, I have been wanting to make these for years! My sister recently made some for a friends baby shower. Go check out her blog, its great and she has some really awesome tutorials up. The poms are so pretty, inexpensive, and customizable. I did a little google research and came across this super easy tutorial on Little Miss Crafts. Go check it out.

This is what you'll need:
  • Tissue paper in various colors. I picked mine up at the dollar store.
  • scissors
  • kids hair elastics
  • ribbon
Start with 8 -10 pieces of tissue paper. starting at one end begin to make accordion folds, until you fold the entire sheet. Next, secure in the middle with an elastic, and attach a length of ribbon to the elastic. It should look like this....

Next, trim the ends. You can round them, or cut them into points. Like this....
Then you'll want to start separating the layers one by one. Take your time with this step, after a few layers, you'll get the hang of it.


Once they are all separated you will end up with these!

So pretty! Also, you don't have to trim the edges at all. if you don't they will look like the pink one in the bottom of the above photo. If you don't trim the edges, I'd suggest adding a few more sheets of paper for fullness.

Happy Friday, and enjoy! ~ Katrina

***Question: can y'all see my links??? they show up on my phone but not on the desktop.... just curious.***

Wednesday, November 10, 2010

Hey Peeps.

Sorry no Birthday party prep post tonight. I have been sick all day, and to top it off I pulled a muscle in my neck, so I am pretty much useless. Check back tomorrow for the latest tutorial. ~ Katrina

Tuesday, November 9, 2010

Happy Birthday November! A Paper Bunting Tutorial.

November is a wonderful month in our house, so much to be thankful for and celebrate. Both of my beautiful daughters were born this month. Mackenzie will be 6 on the 10th, and Coeli will be 4 on the 22nd.

This year we have decided to have a small surprise birthday party, to celebrate their special days. And I have decorations on the brain. And my to-do list is getting long. Full of little projects to create a fun, vibrant atmosphere. So, all week long I'll be sharing those projects with you!

Projects will include:

  1. Paper bunting (today)
  2. Paper pinwheels
  3. party favors
  4. Sweater stuffies
  5. Birthday girl skirts
Each of the projects can be done in one evening, with things that are easy to find, or already on hand. We'll just say I like it cheap and easy ;)  So, with out further delay........


Vibrant Paper Bunting Tutorial!

First gather your supplies. You'll need:
  • Square paper (I used scrapbook paper 10 x10)
  • ruler
  • pencil
  • scissors
  • ribbon
  • hole punch
  • sewing machine (optional)
Step 1: fold a square piece of paper in half, then in half again then in quarters. when you do this only lightly score the edges, this serves as a guide for the next step. When you are finished it should look something like this...

Step 2: Using a straight edge draw a line from the bottom left corner to the top of the first line. Continue connecting the lines on the diagonal,  top to bottom until you have all your triangles. I found that doing it this way you get the most out of your paper. When you are finished it should look like this...


Once you have your first sheet of triangles cut out, you can now use one as a template for the rest.

 Step 3: Start cutting! Th only took me about an hour. When you are finished You'll be left with a lovely pile of colorful triangles.


Step 4:  This step has two options. Option 1: you can hole punch the top two corners of every triangle and lace with ribbon or string. Option 2: Or you can do what I did, and sew them together. I was a little nervous at first, having never sewn paper. But, It proved to be pretty easy, and I think much faster than the first option. I also think they will hang better when sewn. If you chose to sew them together, use some scraps first and test the tension and stitch length. When you are almost finished one triangle, lift the presser foot, and just slightly overlap the top of the next triangle. It's really that easy.

Step 5: Once you have sewn all your triangles to the desired length, punch a hole in each end.
 Then loop ribbon, like so...
Now they are ready to hang!


Make sure to check back tomorrow for another Birthday party tutorial! Happy Bunting! ~ Katrina

Wednesday, November 3, 2010

Halloween

Just wanted to share some photos of the evening. I don't even care that much for the holiday, but I love, love, love making my kids feel special, in a costume I've made, just for them.

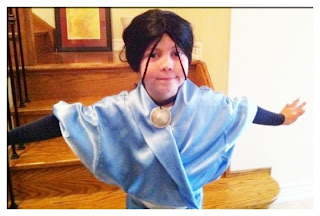
It all started with Kenz (I think) and her fascination with the show, Avatar the Last Airbender. It's a great kids show and Aaron and I even enjoy watching it with them, so that's a bonus!! Kenz, was set on being Katara,which in our opinion was perfect.


Can you tell she embraced her role ! Ha, I love her. I made their entire costumes from things we already had, and if I didn't already have it, I found it at the thrift store. Her blue smock was an old robe that I altered, I bought the blue velvet and white satin remnant at The Goodwill. Oh, the wig was a must, and I did not have one just lying around. So that was new. We went with this Katara image for the costume.


Coeli chose Toph. Which is also totally perfect for her. Toph doesn't take scuff off anyone.....haaaaaave you met Coeli.

Heeehe. As I was making hers I would think to myself how cute and proud she would be while wearing it. Man was I right! This is Toph...


The Girls together.....

I love how they embraced their characters. Coeli's face is priceless in this photo, and Kenzie, well....Kenzie is in mid-blink.

I thought Cohens would be the easiest of the 3. Wow, was I wrong. It required a lot of hand sewing. I almost said, forget it! But I'm glad I didn't cause daaaaaaaaaang was he cute, cute, cute!

He was also an Avatar character. Appa. The flying bison. I re-purposed a monkey costume I picked up at Salvation Army for $5.
After all this crazy sewing, I did not have the energy for carving pumpkins, so we made silly felt pumpkins. Which proved to be just as fun, and half as messy. And that's always good.